Step 2: You can create an user by clicking Users in the menu bar.
Step 3: Now, User page will appear. Click Create User Button and a popup will be shown. Enter the User's Name and Email / Phone Number and click Create User.
Then User will be created successfully.
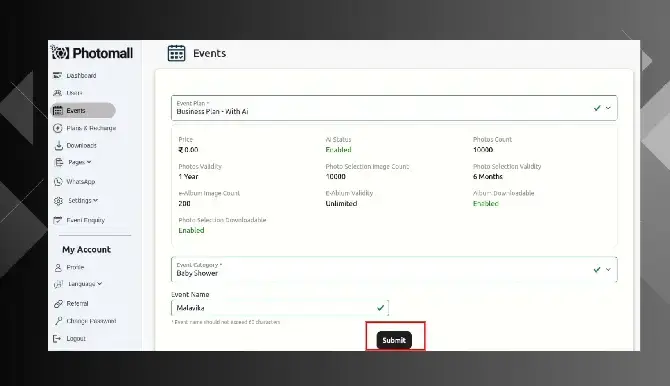
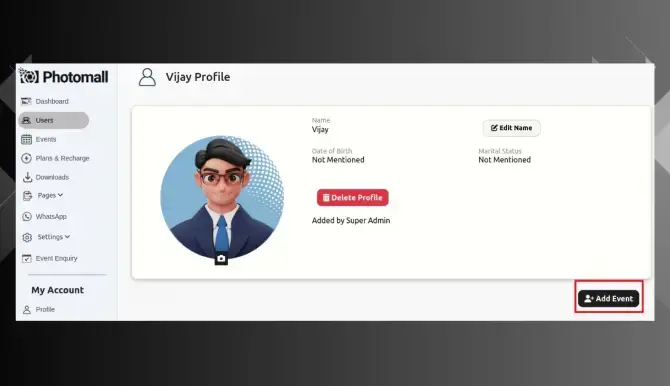
Now, Click Add Event Button, Then Event form will appear.
.
Fill in the form and click Submit. Event will be created Successfully.
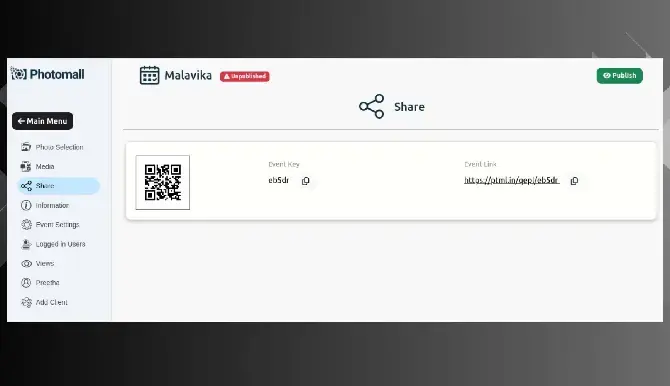
Step 4: Now, the Event page will appear, and you can view the Event QR code (Downloadable), Event Key, and Event Link for the event.
Step 5: Now, go to the Settings page where you can upload the Event Cover image and configure various options for the event.
- The Event will be permanently deleted and cannot be restored at all.
I) Photo Selection Download StatusEnable - Photos in photoselection folder can be downloaded.
Disable - Photos in photoselection folder cannot be downloaded.
II) Photos Download StatusEnable - Photos in media folder can be downloaded.
Disable - Photos in media folder cannot be downloaded.
III) My Photos Download StatusEnable - Photos in my photos folder can be downloaded.
Disable - Photos in my photos folder cannot be downloaded.
IV) Download with Icon and WatermarkEnable - Photos will be downloaded with icon and watermark.
Disable - Photos will not be downloaded with icon and watermark.
V) Media PhotosEnable - All the photos in media folder will will be visible.
Disable - Only My Photos in media folder will be visible.
VI) Android App RedirectionEnable - Event link or QR code will be redirected to Mobile App.
Disable - Event link or QR code will be redirected to Website.
VII) AI StatusEnable - AI Enabled event.
Disable - AI Disabled event.
VIII) Photos Print StatusEnable - Printing option is shown and customers are allowed to select photos from media for printing.
Disable - Printing option is hidden.
- You can submit photo selection in case your customer fails to do so.
Step 6: Now, go to Media page.Click Add Media Button and popup will appear . Select the required option from dropdown list.
I) e-Album
To upload 'e-Album', select e-Album from the dropdown list under the type category and the album size , then click Submit Button.
Either click "Click here to browse" or "Drag & Drop" to upload the images.
You can upload up to 6 Invitations per event
Click "View Invitation" and the page will show all the images uploaded.
You can edit the Invitation name if in need.
Enable Visibility.
IV) Video
Select 'Video' from the dropdown list under the type category and select platform of the video and paste url in the popup menu and click Submit Button.
Step 9: Users - In AI enabled event, you can view all the user match details.
Step 10: In Views page, you can see all the users who viewed this event.
How to Add Clients
Note - Photo Selection will be visible only for the clients. Multiple clients can be added for an event.
Step 11: Click Add Client, Create client popup will appear. Enter Name and Phone Number / Email Address and click Submit Button
Step 12: - After the images are uploaded in the event, click “Publish” to allow the customer to view the event. Once you click “Publish” it will change automatically into “Enable Edit”.
Click "Enable Edit" to carry out any changes in the event.Once you click “Enable Edit” it will change automatically into “Republish”. Note: If you click "republish", the event will be visible to the customer again.
- When you click “Unpublish”, the event will not be shown to the customer (This option is provided to help you out from hiding the event from the customer, if there are any issues) Once you click “Unpublish” it will change automatically into “Publish”. Note: If you publish again, the hidden event will be visible to the customer.